The previous two node tutorials were updated, one failed, one was said to be very slow, were deleted. Today to update another node construction method, speed pro-test to meet the needs of everyone's TikTok operation
Stern Statement:
Full text
Buy Server
First, we need to buy an overseas server, recommendedhostwindsThe server, which can change IPs and supports paypal, is not expensive and is perfect. Next introduced
Trojan construction method some server vendors limit the performance of the server is not built (such as vultr), thehostwindsPersonal test can be built, so recommended
Click to go directly to hostwinds official website
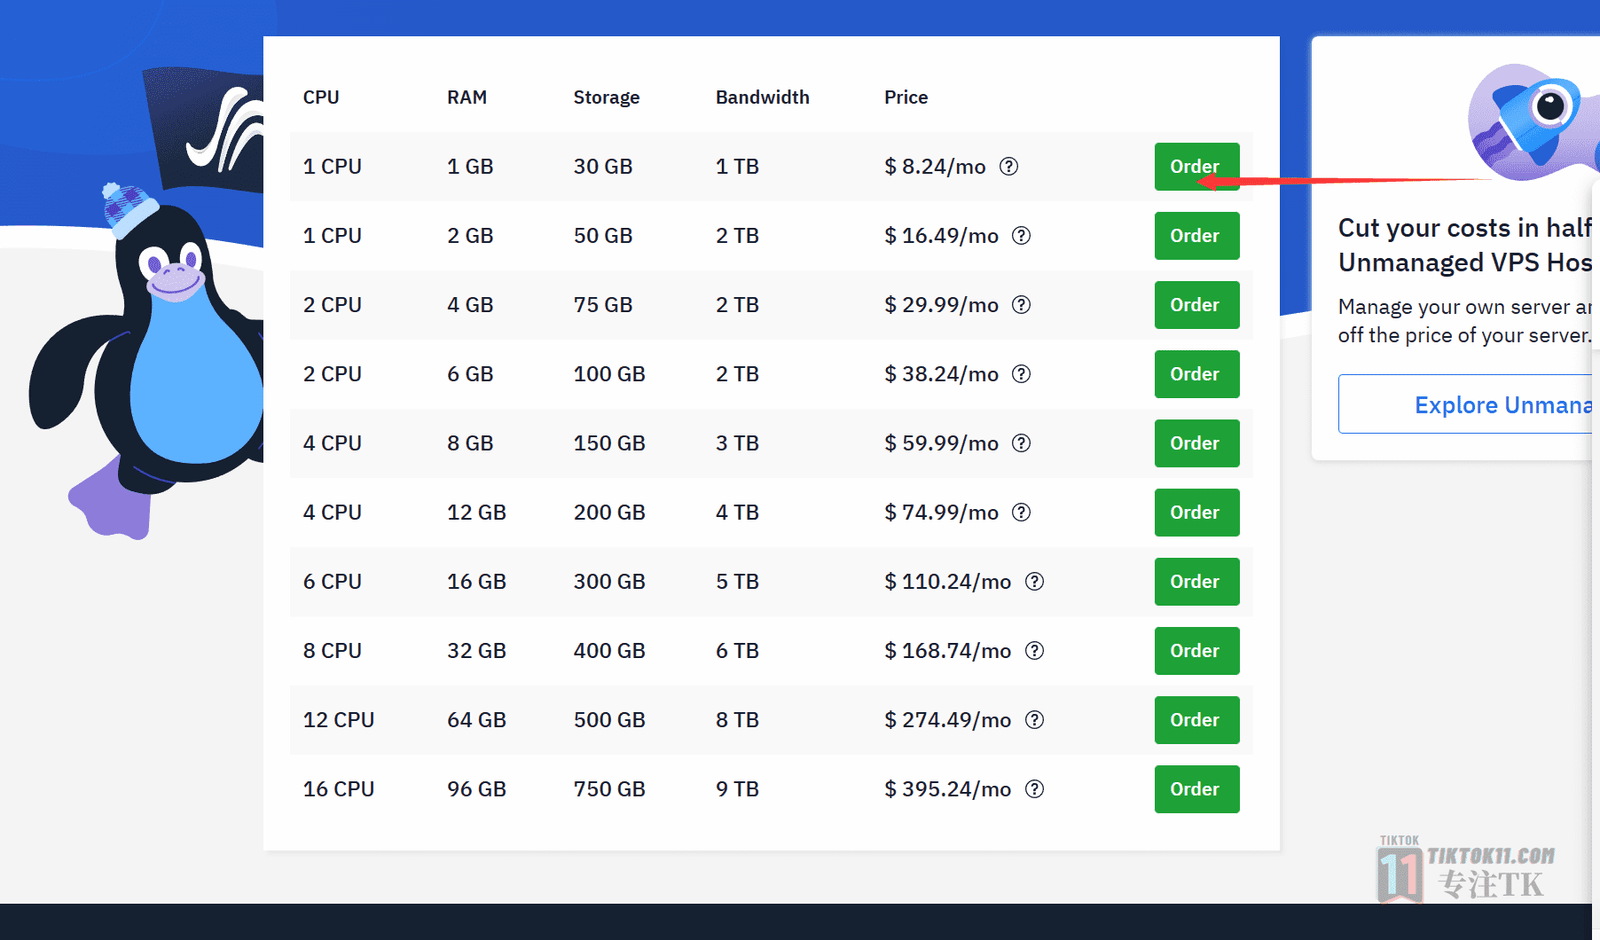
Click on "order" to enterhostwindsRegistration interface, if you do not have an account, you can register one, register to choose China before you have the function of changing IP and Alipay payment. If you already have, after logging in will jump to the purchase interface, purchase configuration as follows can be referred to:
After that, if the country you chose before is China and you don't have a proxy to enter normallyhostwindswebsite, then there will be a paypal payment, just choose to pay.
An email will be sent to your email address after purchase with detailed information about the server.
Check if the server IP is normal
In this step, we need to perform a test on our open server IP, to detect whether this IP is walled, if it is walled, we need to replace it with a new server IP, otherwise the construction of nodes on the walled IP will not be connected even if the construction is finally completed.
Find our hostwinds server IP at
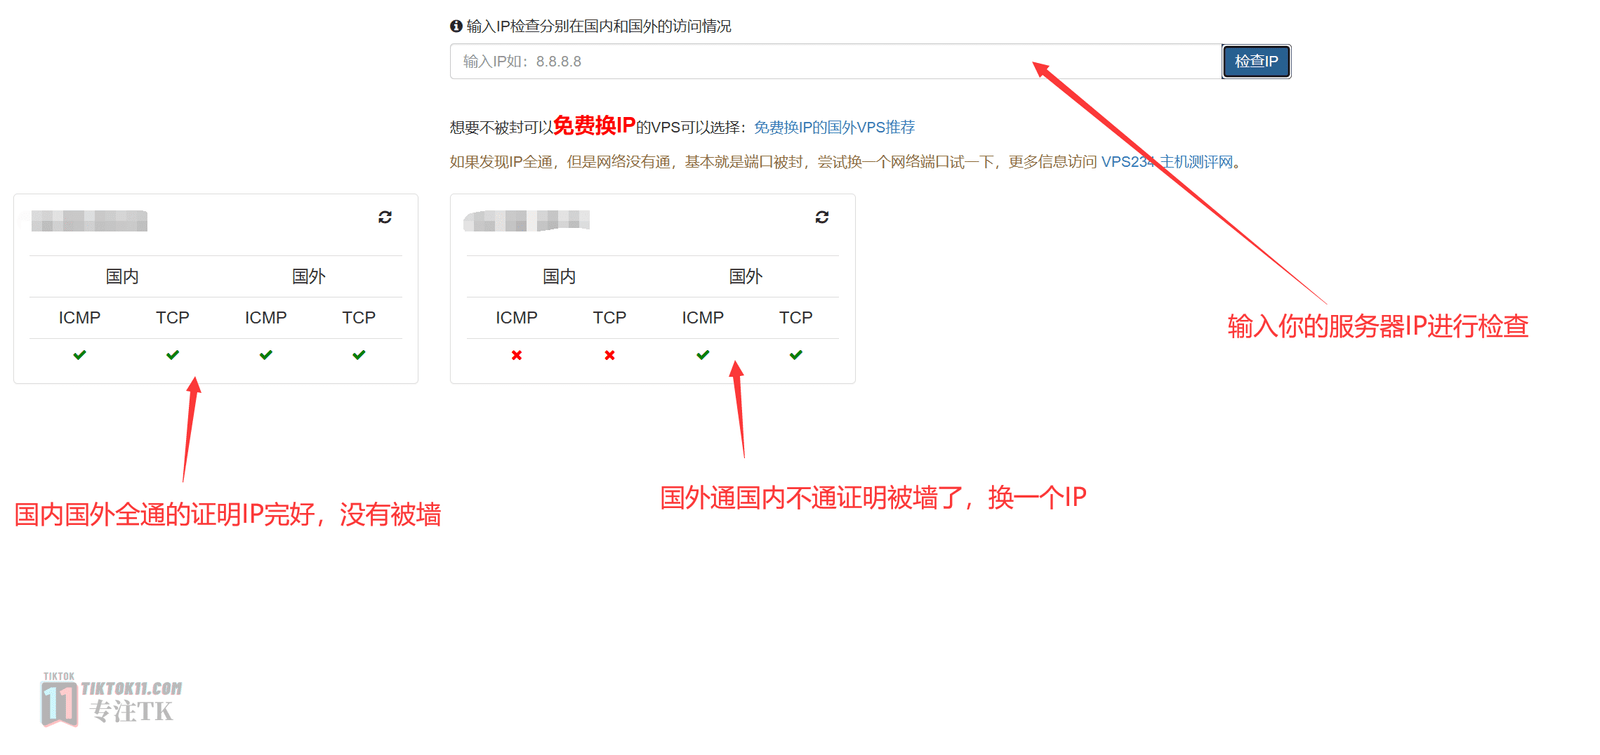
After finding the server IP, we need to detect it, you can useThis websiteTesting, the results of which are classified as follows:
The first situation: domestic pass, foreign pass, that means the IP is normal, not walled, can use
The second situation: domestic can not, foreign pass, that IP is walled, need to replace the IP
The third situation: domestic can not, foreign can not, most of the VPS machine did not start well, to see if it has started
If you open to the second case of IP, that is, the walled IP, then you have to change an IP.hostwindsThe steps for changing IP are as follows:
ClickFix ISP blockAfter that, you need to wait for a period of time to let it replace a new IP, may also sometimes point after no response or the original IP, wait a little longer or press a few more times, after replacing the IP you also need to detect once again whether the newly replaced IP is walled, the specific method has been described above. Theoretical replacement within 3 times should have a good IP, because it can be convenient to change the IP at will, for the sake ofhostwindsUsed by many people to do messy projects, so some IP inevitably be walled, be patient.
Next, we need to have a domain name
Buy domain name, resolve to server
Recommend tonamesiloPurchase code, international big site, no audit, support paypal
After purchasing a domain name, add a resolution in the DNS resolution interface to resolve the domain name to your server IP
To access the namesilo DNS resolution interface:
Add the first parse:Select the type of resource record to be created--A--Enter @ for the hostname--IPV4 address is filled in with your server IP--Click SUBMIT--The first resolution is complete
Add a second paraphrase:Select the type of resource record to be created--A--Enter www as the host name--IPV4 address is filled in with your server IP--Click SUBMIT--Second resolution completed
Next, wait for DNS resolution to complete, you can enter the command interface by using the shortcut key wind+R and then typing cmd enter, typeping your domain nameIf the return is the server IP you filled in, it is successful, if it shows timeout, you still need to wait, if the waiting time is too long, try DNS resolution again
Once the DNS resolution of the domain name is complete, the next step is to connect and deploy it.
Connection Deployment
Download ssh toolFinalShellDownload, install, and open
FindhostwindsThe username, password:
Find and enter the information about your server and connect to it at
To access the ssh interface:
We need to enter two lines of code:
Install the Curl dependency package:
CentOS and Fedora systems:centos: yum update -y && yum install curl -y
Debian and ubuntu systems:apt-get update -y && apt-get install curl -y
If you are following the server configuration I purchased above, which is Ubuntu, select the second line, copy and paste it into the ssh interface and enter:
And after that, we can typeOne-click buildingscript to build it up:
Copy and paste the following script code, same for any system:
source <(curl -sL https://git.io/trojan-install)
See the figure for the specific process:
If you are proficient in linux, you can edit and manage it in ssh panel directly after you build it. If you are a novice, I recommend you to use the visual panel, enter the domain name of your build in the browser, and you can access the web management panel.
By default, the Trojan admin panel in the web interface does not have a login password set.
Use your browser to enter your domain name in theFirst timeWhen you enter the admin panel, you will be prompted to set a login password. Enter a strong password at this point and enter it twice to make the new password effective.
After that, you can log in to Trojan Panel with the username admin and the password you just set to manage everything.
Log in to the backend and set up each function now.
The main interface of Trojan Panel is shown in the following figure:
The main screen can display the following common information:
- Server's CPU/Memory/Swap/Hard Disk Occupancy Information
- Trojan version
- Number of Trojan users
- Trojan runtime
- Server Load
- Upload and download information
In addition, under the inverted triangle menu at the top right of the main screen, you can:
- View System Version
- Modify website title
- Change Login Password
- Set English and Chinese display
Caution:
It is recommended to finish the modification as soon as possible, because the default title contains the word Trojan, which is easily identified as a proxy server and can be modified to some irrelevant words at will.
OK. By this point yourTikTok NodeEven if the construction is completed.
The next step is to connect the nodes:
Computer side:
Downloadv2rayN-CoreUnzip and install
web admin panel login--User Management--You can add a new user or use one of the initial users--Share--Trojan link, copy link--v2rayN Program Home Page--Servers--Import bulk URLs from the clipboard--Nodes are added to the home page.--Select the newly added server, right click and set it as the active server
After that, click on the system tray in the bottom right corner of your computer.Right clickClick on the v2rayN icon, select System Proxy, select Auto-Configure System Proxy, and select Bypass Continental or Global for routing. v2rayN icon turns red and you can log in to youtube.com to see if the site is connected.
Android side:
Downloadv2rayNGDownload the appropriate version, install it on your phone, and open
web admin panel login--User Management--You can add a new user or use one of the initial users--Share--Trojan links--v2rayNG Application Home Page--Upper right corner plus sign--Swipe--Nodes are added to the home page.--Check the added node--Click on the gray V-circle button to make it green--Google Chrome visit google.com to see if it is successfully accessed
Apple side:
Recommended use of small rockets (Shadowrocket), but its download conditions are a bit troublesome, first you need to have a U.S. Apple ID, only the U.S. app store you can search for Shadowrocket, and the download requires $3, if you do not have a U.S. Apple ID, there is no payment channel.Then I recommend that you directly buy someone else has purchased the small rocket of the U.S. Apple ID login Apple Store direct download.
Here is a recommended URL:
Buy US Apple ID and Little RocketHere to remind, before the purchase to see how to use, the purchase of Apple ID only login store, do not log in the settings
After downloading, installing, and opening the little rocket
web admin panel login--User Management--You can add a new user or use one of the initial users--Share--Trojan link, QR code--ShadowrocketProgram Home--Swipe the top left corner--Scan the QR code of the sharing link--Select the newly added node--Open Unconnected button turns green--Google Chrome visit google.com to see if it is successfully accessed
Built node Apple phone speed measurement:
Finally, once again, a stern statement:
2024.1.8
updatedTikTok NodeThe build tutorial has been updated, and this build balances speed andstabiliseThe server is built with dual iSP US native IPs, with high quality IPs, and a linestabilise, for those interested, you can watch it after the jump:
Updated 2025.1.17 The 2025 node tutorial has been updated to use the visualization panel and the accompanying transit tutorial, feel free to jump in and read it, the methodology in this article follows the [...]
2024.4.10
With the methods in this article it is very easy to build your ownTikTok Node, but such nodes are directly connected nodes that can be used for daily TikTok feeder operations, but the live streamingstabiliseSex is slightly worse, the wind control period nodes may also be walled unavailable, there are live demand andstabiliseSexual needs of friends can jump to the following article, this is an article will be nodes through the dedicated line transit, nodes through the dedicated line for transit, rate andstabiliseSex is dramatically improved and effectively prevented from being walled off.


