February 14th is Valentine's Day, on which thetiktokThe app is also back online again in the US APP store and Google store, and this news is kind of a relief for thetiktokMan a little Valentine's Day gift 😀 For US users, this means they don't have to go through complicated third-party means to download thetiktok, you can install the update directly in the app store, so to speak.tiktokhas largely survived its darkest hour, whether or not there are twists and turns to come, but for those of us who are focused on thetiktokIt has turned out well so far for the practitioners of the
And today, the webmaster also re-examined some of the articles on this site, found that some of the article's indeed too busy negligent management led to some backward. One of them isTiktok node article from a year agoTherefore, today took the time to organize and update a new node building tutorials, you can rest assured that all the methods and tools in these tutorials in the product is my own personal use, indeed good experience before writing the tutorials, has been committed to optimizing the tutorials in detail and operability, the webmaster to share can not say that they are suitable for everyone, can only say that the more general kind, only to do to share references and introductions to use, the purpose of using the formalTikTok cross-border operationsIf you have any questions or suggestions, you are welcome to raise them in the comment section, so we can discuss them together.
Let's get to the official article next, and before we start, post a statement to save your life (hh)
Why create your own exclusive tiktok node?
As we all know.tiktokIs not for domestic operation, and in the domestic jitterbug red sea of involution, out of the sea operation tiktok is a better choice, and the first step to operate tiktok, is to have a good enough and stable tiktok node to cross the CFW to access tiktok.
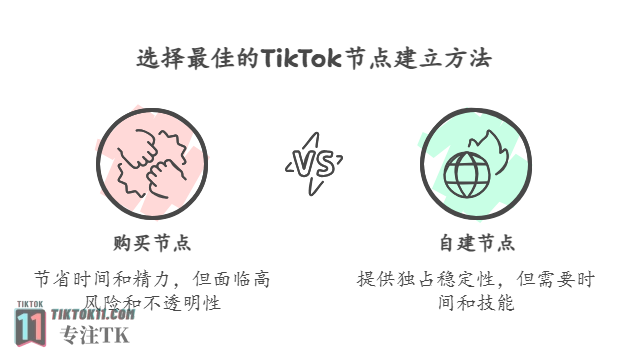
And to have tiktok nodes only two ways to buy nodes and self-built nodes, buy nodes of the advantages of saving time and effort, do not have to maintain your own nodes, for people who do not like to toss the pursuit of efficiency is a suitable choice, but the shortcomings are also a lot of nodes, nodes of this thing is not regulated opaque, the so-called tiktok nodes on the market are mixed service providers, the price is usually inflated, and Sometimes there is also a single node selling multiple people, according to the webmaster these years business dealings with a lot of service providers, there are many reliable node service providers, but more unreliable. If you decide to buy tiktok nodes, to do a good job of risk management. The self-built nodes, the benefits are exclusive and stable, is their own VPS to build, only one person to use, stable, if you choose to the right protocol and VPS will not have a problem, the downside is also there, you need to spend time to study, to learn some of the basics of cross-border network, there is a cost of time, there is a node to be walled in the possibility of the node. But later you understand the cross-border nodes in-depth, you can individually according to your own network conditions and operations market reasonable construction of their own nodes, the use of soft routing and other professional network equipment to achieve better and more stable cross-border access!
Purchase nodes and self-built nodes have their own advantages and disadvantages, there is no best choice, only the most suitable for their own choice, your friends can choose at their own discretion.
This site has been continuously updated self-built tiktok nodes related tutorials, only to help the majority of users tiktok formal cross-border operations reference used, the tutorials have been kept detailed and operable, if you are interested in self-built tiktok nodes, may wish to take a look at my tutorial articles, I hope you useful!
How to build your own titkok node?
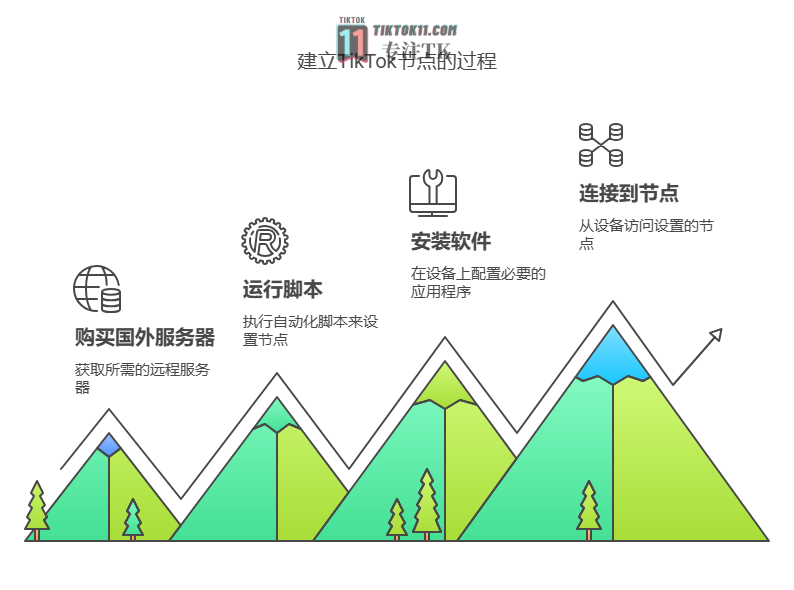
Many novice friends may have a difficult psychology, think self-built titkok node is a very complex process, in fact, this is right and wrong, the reason for the construction of nodes you do need to understand some of the logic and concepts, a variety of messy protocols and encryption principles, lines and so on, but this is the construction of nodes behind the things that are the theoretical knowledge, if you're lazy, don't go to understand it can also be done, and the actual operation! The process of building nodes is actually very simple, now there are many one-click script, use one-click script, then even simpler: buy a foreign server, connect to the server to enter one-click script run to build a good node, and then install the agent software on the phone or computer, use the software to connect to the server node, complete.
So building a node is just a few steps, you build your own node, and then you can learn the principles and knowledge behind it, or you can just use it without learning. There are no barriers at all, and I'm sure a person with normal logical thinking skills can go through with it!
Of course, the above one-click script tutorial is only the simplest and most convenient node, this paper builds the tiktok node to ensure stability, high speed and security there will be some additional steps and processes, there will also be some additional expansion methods, but will be a detailed description and graphics to ensure that operability!
Okay, without further ado, the tutorial follows.
Step 1: Buy a VPS
First of all, the first step in building tiktok nodes we need to buy a foreign VPS, commonly understood as offshore servers, in simple terms.The offshore server is like a "virtual bridge" to help your device bypass geographical restrictions and connect to TikTok's services. Our Internet access request will be encrypted and transmitted to the offshore VPS, because the data is encrypted, so it won't be recognized by the Great Firewall to intercept it, and when the access request is transmitted to the offshore VPS, the offshore VPS will execute the access request and then return the data to our mobile phone. After the access request is transmitted to the foreign VPS, the foreign VPS will execute the access request and then return the data to our cell phone in the original way, because the final execution of the access is the proxy access of the foreign VPS, and the IP used is also the IP of the foreign VPS, so this kind of behavior is also commonly known as "hanging proxy node".
As an example:
When you want to watch @WorldWacky videos:
Your phone → [encrypted] → LA servers → TikTok HQ → [decrypted] → video transmitted back
The whole time GFW could only see you and the server "chatting", not knowing that you were actually passing around TikTok
The above is a relative simplification of the entire titkok node data transmission links, easy to understand, explains why you want to buy a foreign VPS, then the next step is to buy a VPS. Before the webmaster also updated some recommended articles about tiktok server VPS, welcome interested friends to jump to read:2025 Dual ISP Residential VPS Server Merchant Recommendations, TikTok Pure Native IPsConstructionTikTok NodeIt is best to use IPs with ISP characteristics, which are called residential IPs. similar to the IP characteristics used in the homes of ordinary normal residents, on the one hand, the risk probability of such IPs is lower, and it is not easy to be reviewed and controlled by the TikTok IP blacklisting library, on the other hand, the characteristics are similar to those of real people's homes, so that you can better disguise yourself as a real person to visit titkok to get traffic.
The tutorial in this article uses thelisa hostVPS, this VPS webmaster is also used in the operation, the experience is good, the rate and stability can meet the demand, in the previous 2024 tutorials are also used as a tutorial use cases2024 latest tutorial, one click to build three protocols TikTok node, stable, safe, fast, white can also brainless build TiKTok exclusive nodesThe evaluation of everyone is also good, so this tutorial is also along the products of this business tutorial example, your tiktok business in that country on which country to choose which country VPS, of course, lisa hosting operation area only the United States, Britain, Japan, Taiwan, Hong Kong, these areas, if there are no some of our friends in the operation of the region, you can also look at the webmaster's previous VPS recommendation article, the Maybe there will be a region you need to 👇, build methods are universal!
👉TikTok native residential IP service providers recommended, operation must
👉 TIKTOK Unlimited VPS Organizer, TIKTOK Operating Node VPS Recommendation
Okay, next let's buy a VPS
interviewsLisa (lisahost(official website)
For your convenience, you can directly click the button to go straight to the official website of Lisa Hosting:
Click to go directly to the official website of Lisa Hosting
Suggestions for those who don't have an accountRegister for an account firstMake another purchase.
After registering for an account, you are on the main backend page, click on the left side of the "Products & Services", and in the drop down select "Purchase Products"
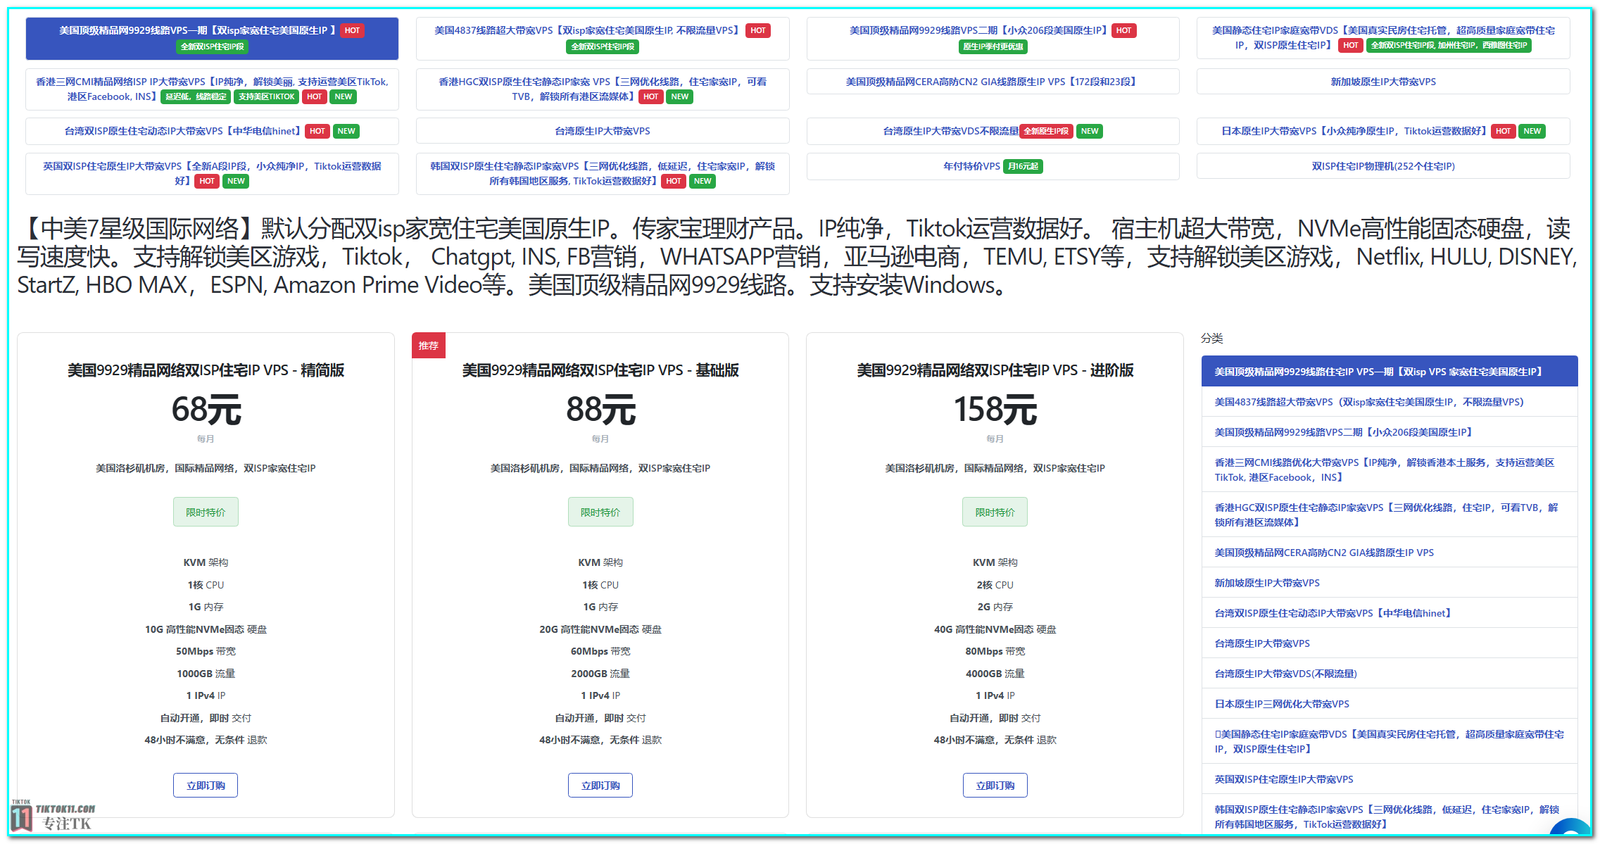
After that, you will come to the product package selection interface, Lisa hosting provides a variety of prices and packages of VPS products, you can freely choose according to their own situation.
Operational TIkTok Recommended OptionsPackages with Dual ISP Home Wide Residential IPsAs you can see, for the U.S. region, Lisa Hosting has two packages that offer dual ISP home wide residential IPs, namelyU.S. 4837 line mega bandwidth VPS [Dual isp home wide residential U.S. native IP unlimited trafficandU.S. top boutique network 9929 line VPS Phase I [double isp home wide residential U.S. native IPThe lowest price is $68 per month.
The difference between these two packages is that the lines are different, so how to choose between these two lines? Simply put, the 4837 line is more friendly to Unicom users, with poorer support for telecom and mobile, while the 9929 is available to users of all three networks (telecom/mobile need to go around Unicom's access port), so if you are a local network is a Unicom operator, the 4837 line is sufficient, and if you are a telecom or a mobile operator, it is recommended to choose the 9929 line.
Of course, a lot of times if it's not for TikTok live streams and the like that require net rates andstabiliseSexually demanding business activities, these two lines for TikTok daily operations send video and so on in the daily use of the perception of the difference is not great, and this tutorial will also end up in the construction of the node on the transit tutorial after forwarding after the three networks are the same, these two lines lisa host base package price are the same, but the configuration is slightly different, 9929 base package compared to the 4837 base package. Maybe because the line is more high-end, in order to balance the cost considerations. The same price to the bandwidth and traffic are lower, 9929 basic package gives 50mbps bandwidth and 1000GB traffic, 4837 package gives 300Mbps bandwidth and 3000GB monthly traffic.
But in fact, on tiktok daily operations and upload video, not live, 30Mbps-40Mbps enough to smooth brush video and upload video, the average monthly flow in 100GB-200GB per account, and live bandwidth words on the contrary in the second, need to pay attention to is the latency and stability, and to reduce the latency and improve the stability to be on the line, on the dedicated line of the case of bandwidth 20~30 Mbps is enough, live average monthly traffic in 800~1200 GB, so see lisa host even 9929 lines of the basic package can meet the daily operational needs, so we do not have to worry about the lack of bandwidth, of course, if you have bandwidth anxiety, that can be on the better package, according to personal preferences and budget selection on the good!
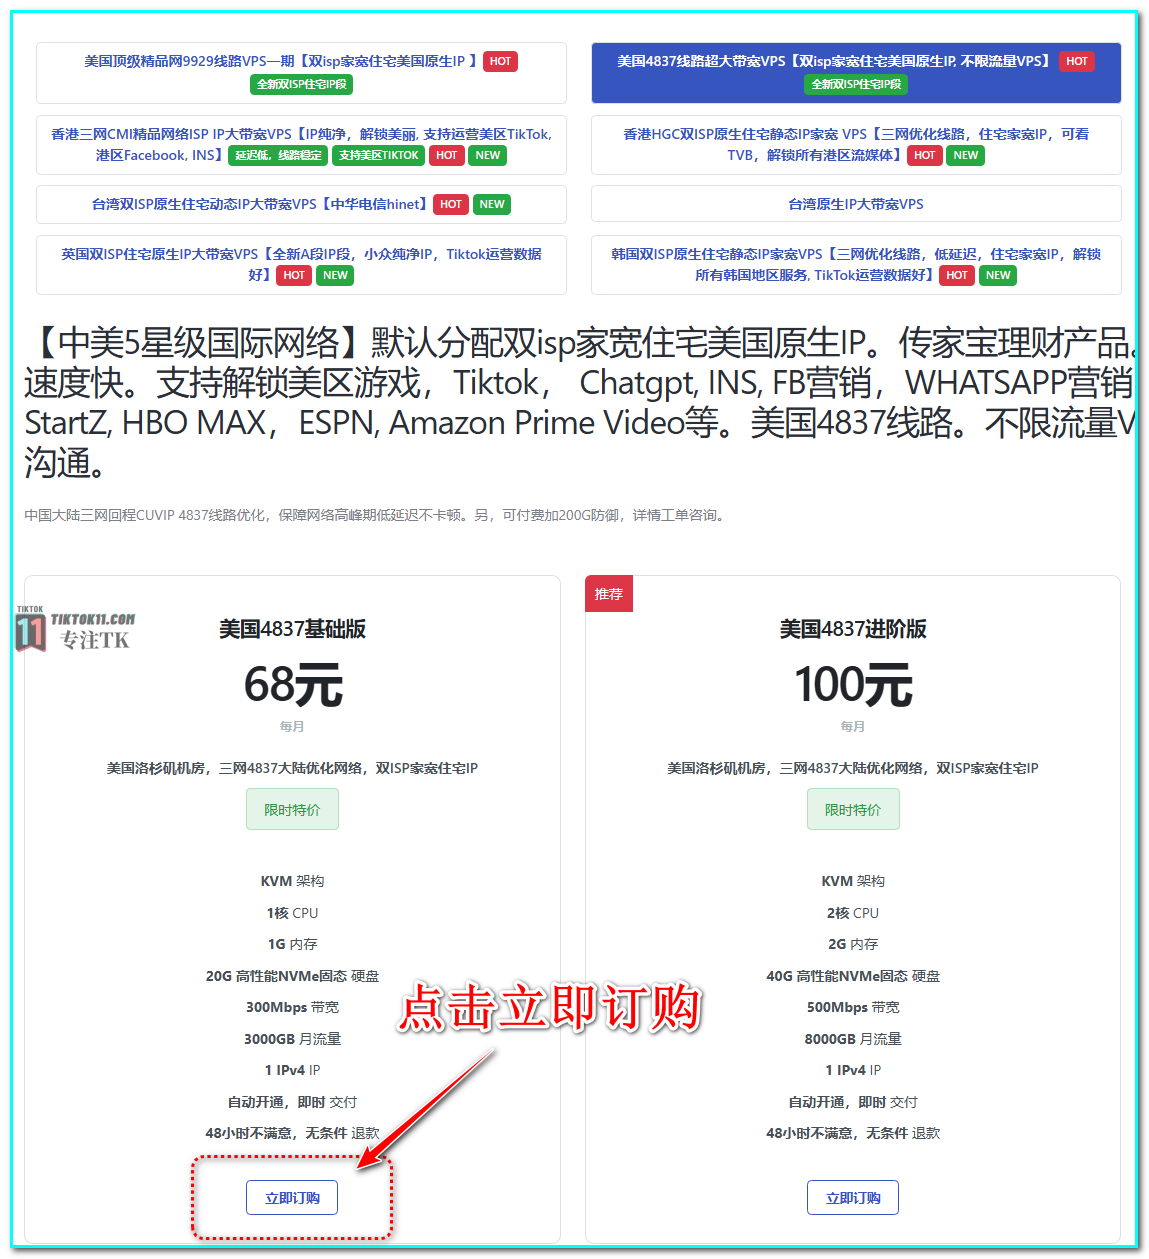
Because the webmaster himself is a Unicom operator, so choose the basic version of the 4837 line tutorial demonstration
Buy VPS
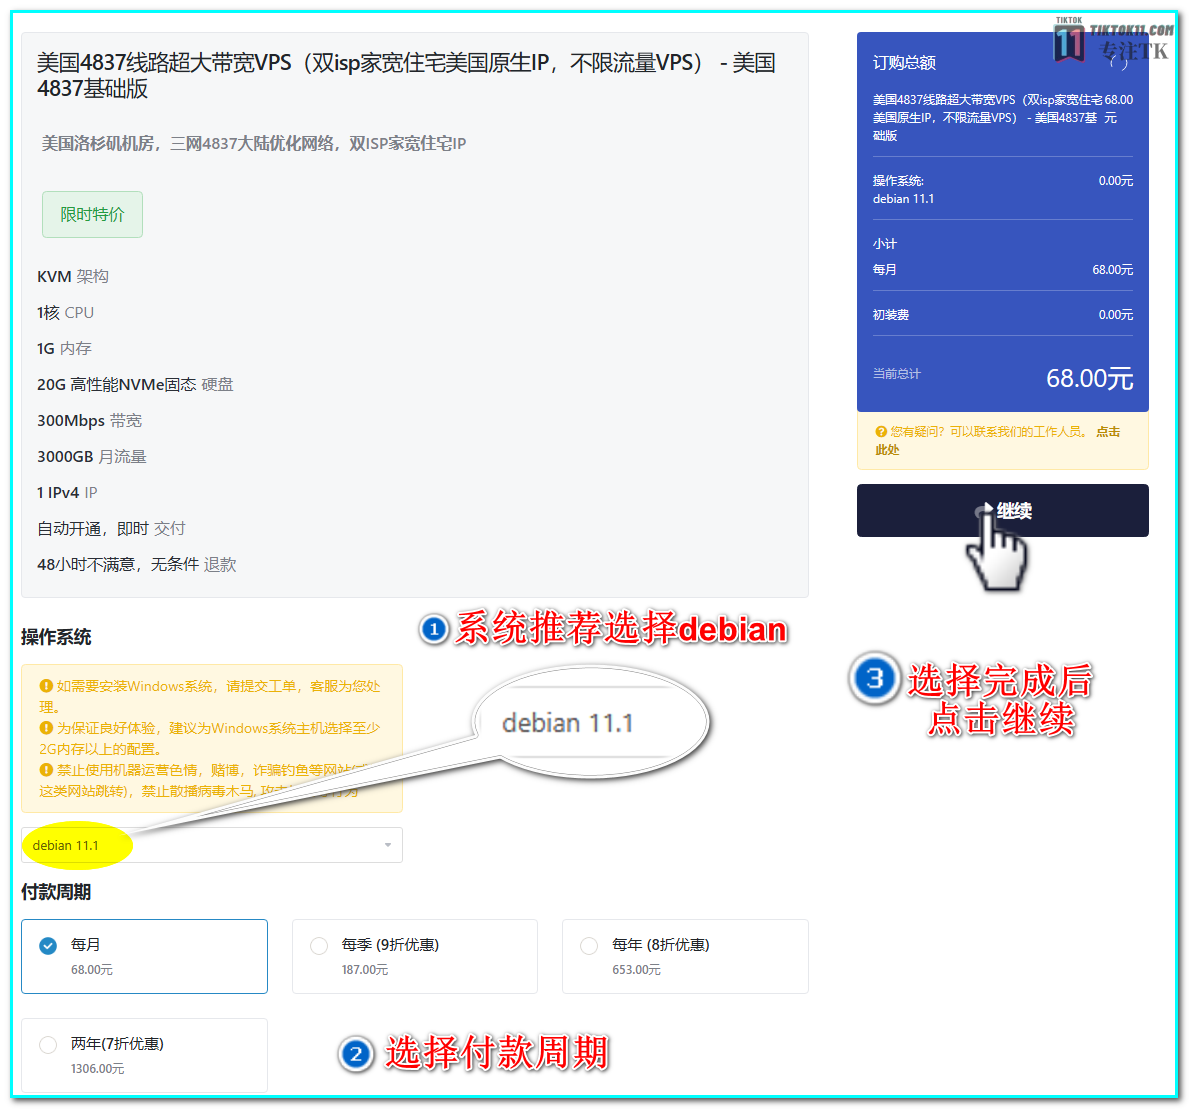
Click "Order Now" to purchaseU.S. 4837 line mega bandwidth VPS [Dual isp home wide residential U.S. native IP unlimited trafficThe $68 price package of
Come to the checkout page, linux system selectiondebianIf you want to buy a machine, choose 1 month, and if you have the conditions, we suggest you choose quarterly or yearly payment. The machine of Lisa Hosting is still quite good, and the IP is in high demand, so after you finish choosing the machine, click Continue.
- Ubuntu 22.04+
- Debian 12+
- CentOS 8+
If an error occurs during installation, try reinstalling the system. We recommend installing the above version of the system.Otherwise the installation process will be prompted glibc version is too low, the webmaster of the latest test Ubuntu 22..04 can be built normally!
After that come to the checkout page and enter the promo codeTS-CBP205DQJEYou can get 10% price reduction, click checkout and use Alipay to pay.
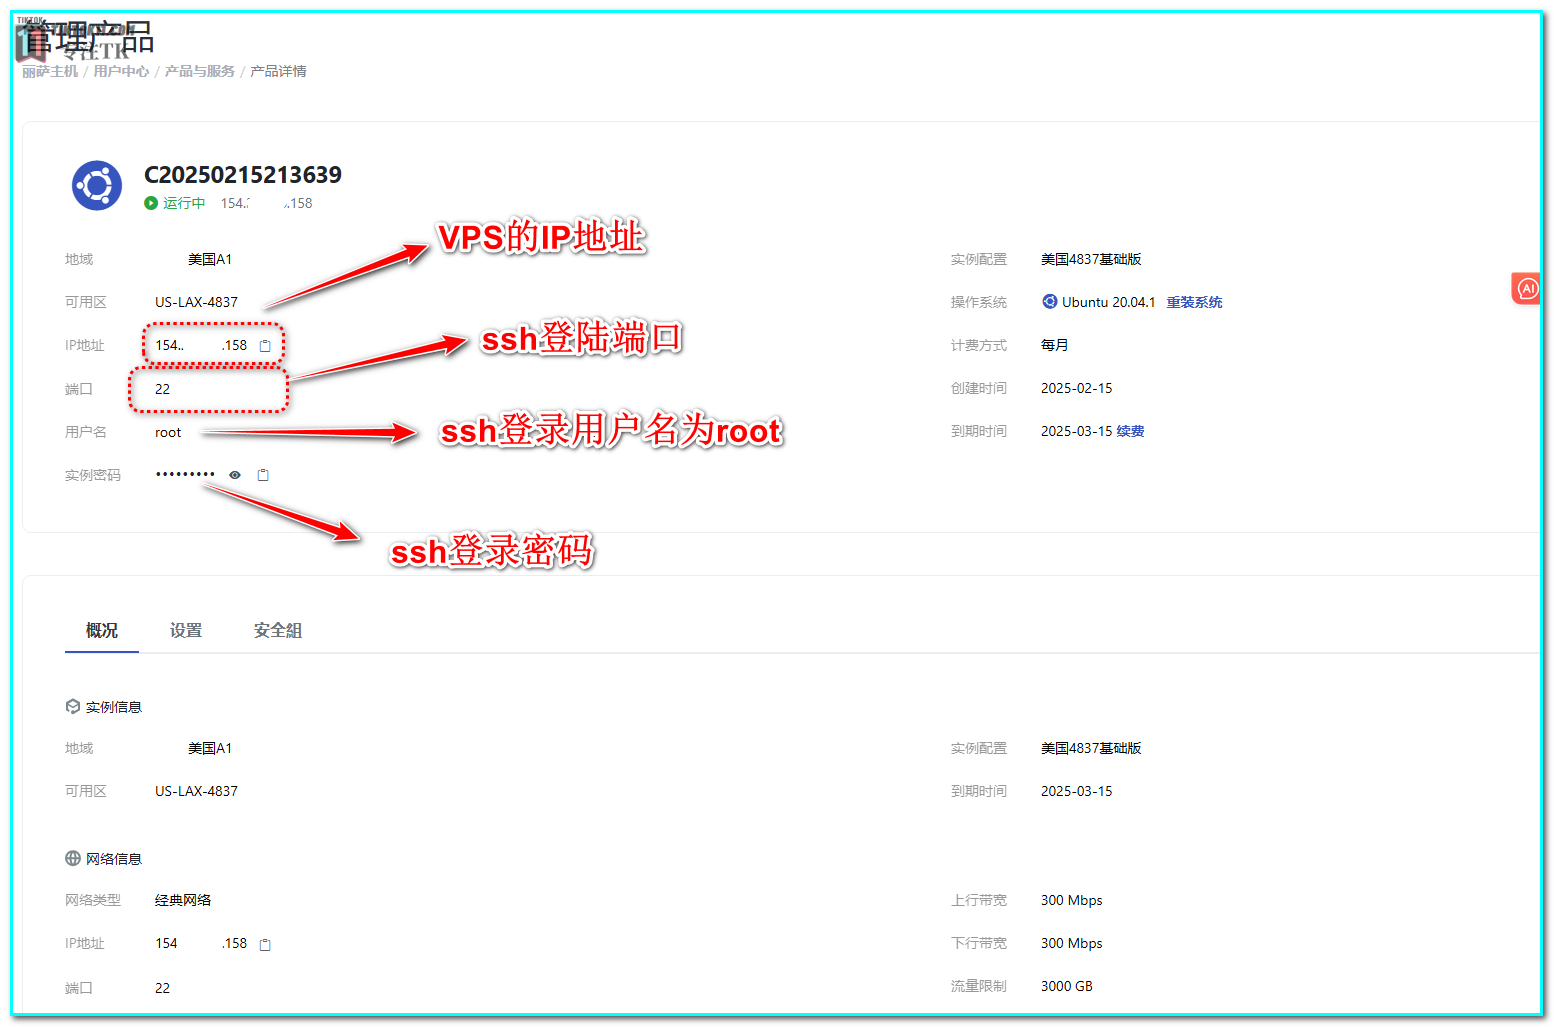
After payment your registered email will receive an email notification from Lisa hosting will send you the SSH login username and password, of course, this username Password can also be seen in the website machine background, click on my products, click into the purchased server, you will see it!
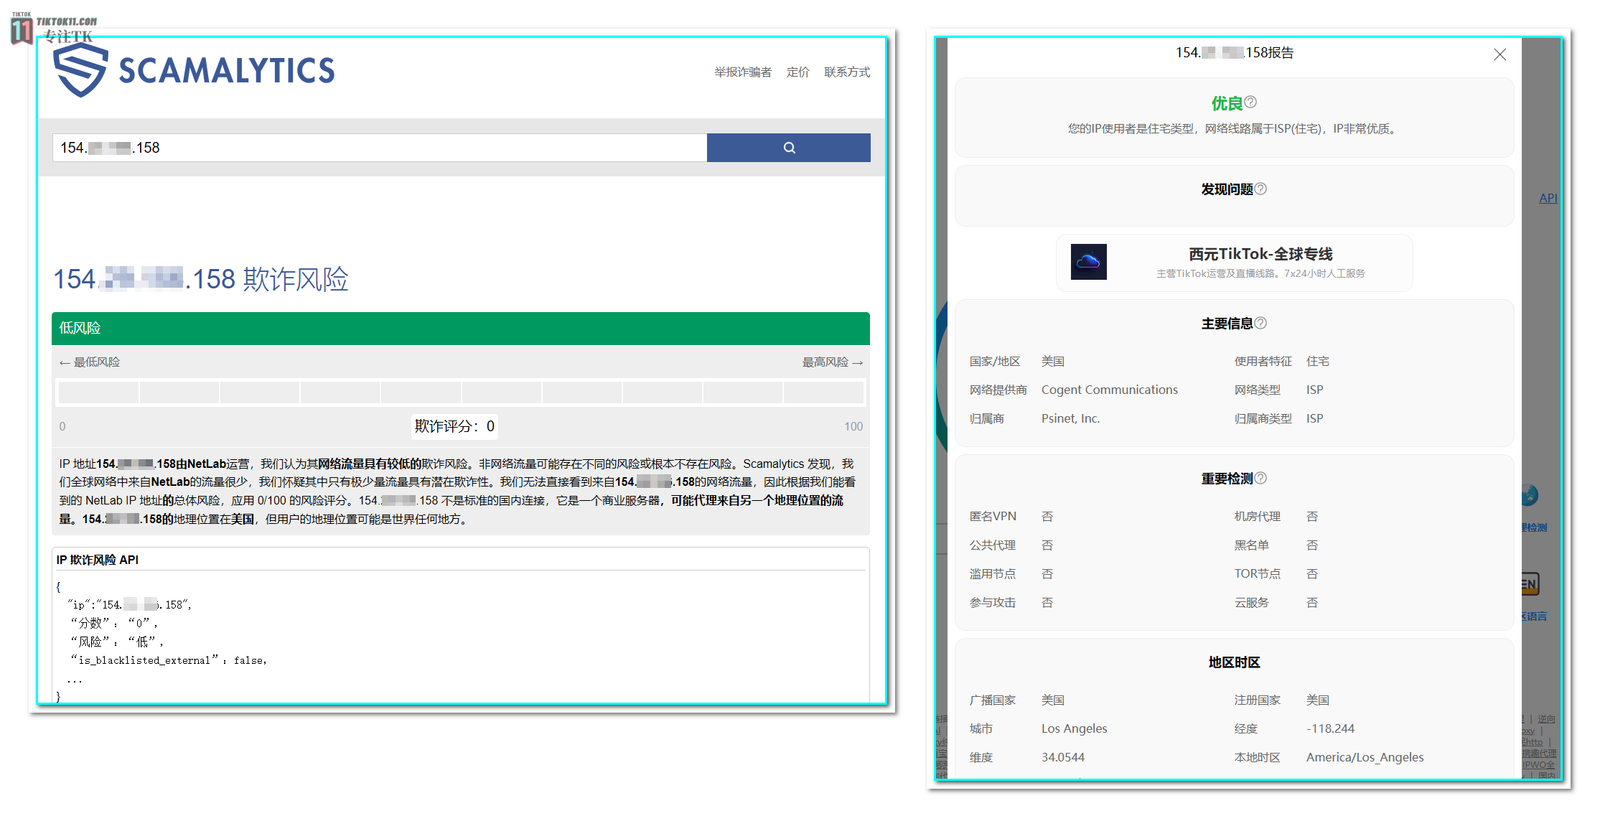
Webmaster after the purchase of the purchase of the VPS IP purity, or very good, of course, this purity only as a reference, do not have to be too superstitious!
Step 2: Purchase a domain name
After purchasing a VPS, we also need to buy a domain name, domain name has many roles, do the website, do the domain name mailbox, etc., and the domain name in the construction of tiktok node is also very useful, on the one hand, we will use in the construction of the node process will be used in the construction of the visualization panel, the domain name can be used as an entry point for us to log in to the panel, than to log in with the server IP high security coefficient, on the other hand, some of the node On the other hand, some node protocols (e.g. reality) will also use some information of the domain name to disguise the traffic, to better break through the blockade and improve security.
So, to summarize, we need to go buy a domain name and resolve it to the lisa server we just purchased
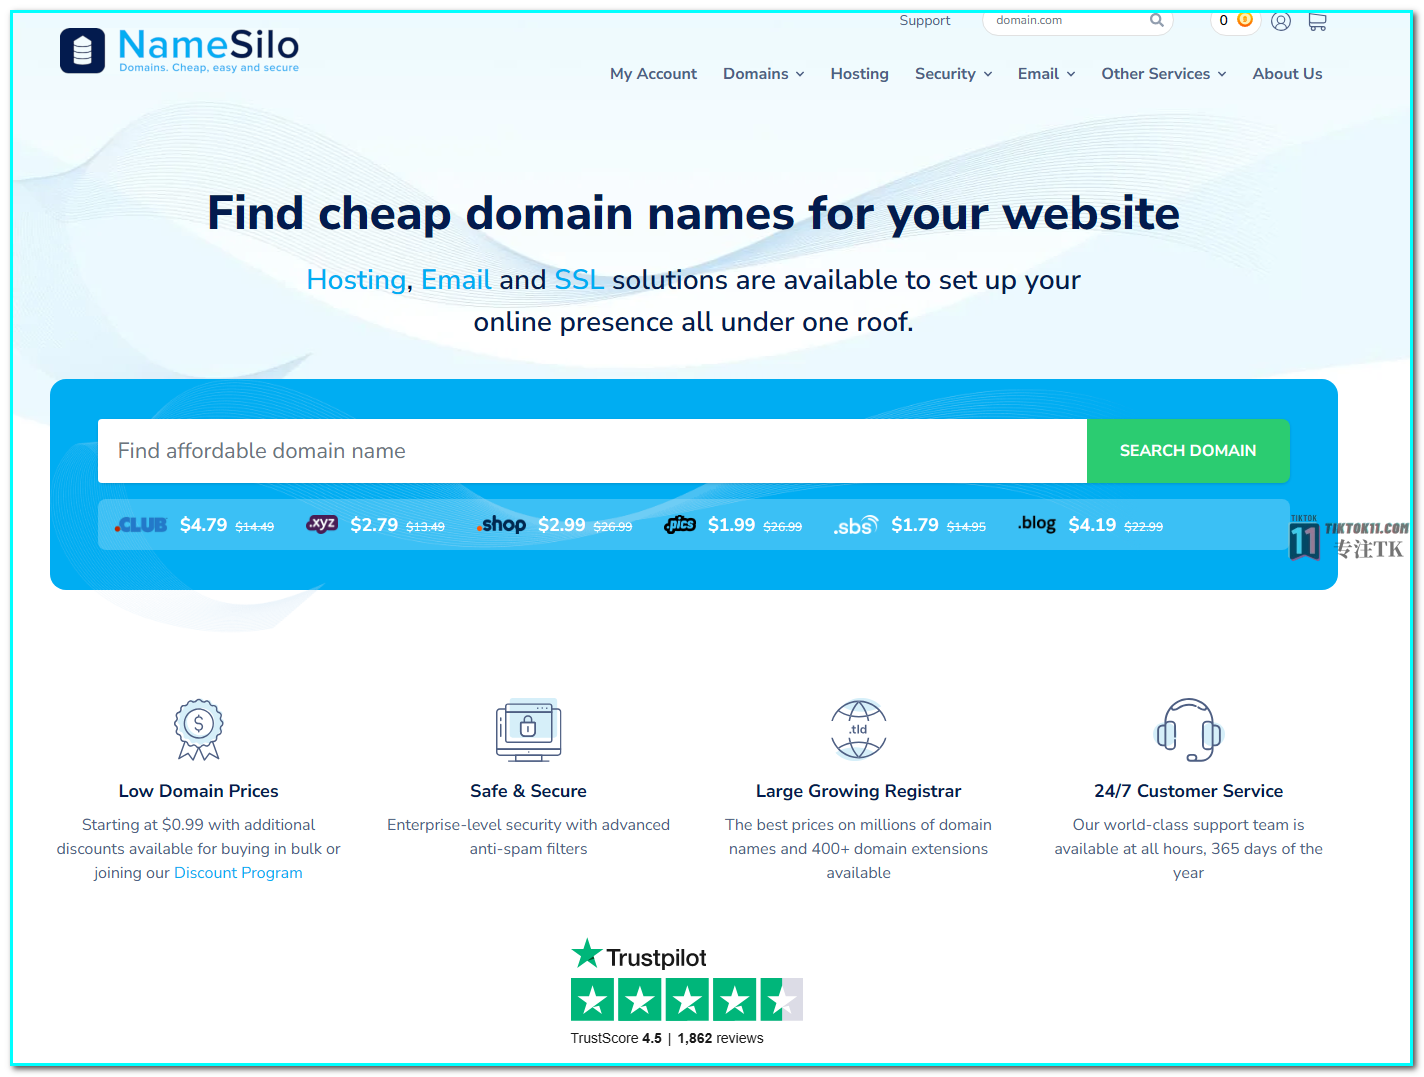
So, how do you buy a domain name? Where to buy it? Here the webmaster recommends that you go tonamesiloPurchase a domain name.namesiloIs the world's top-ranked domain name hosting provider, cheap and fair prices, and support for Alipay, this site domain name is also hosted in this business!
Click to go to the namesilo homepage
Because of space limitations, and buy a domain name tutorial before the webmaster in another how to build their own domain name mailbox article has a detailed graphic description, need to know friends can go to the jump to read the registration of domain names and then come back to continue the tutorials👉.TikTok batch starting number!In fact, it is also very simple to search for the domain name you are interested in, if you have the intention to buy a good point of the domain name of the suffix, if you do not intend to buy a random suffix cheap domain name, there is no requirement!
After purchasing a domain name, add a resolution in the DNS resolution interface to resolve the domain name to the IP of the server you purchased in the first step
Go to the namesilo DNS resolution interface and click on yourJust purchased the domain on the rightblue ball, enter the DNS modification interface:
Add an A parse:Select the type of resource record to be created--A--Hostname with @ or letter prefix--IPV4 address is filled in with your server IP--Click SUBMIT--Domain name resolution completed
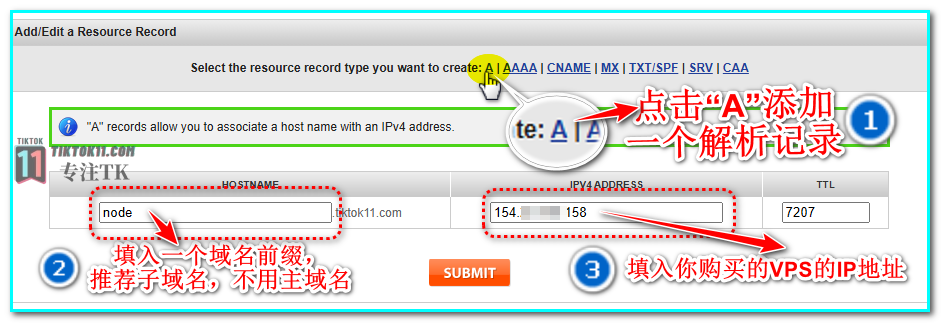
ping your subdomainIf the return is the server IP you filled in, it is successful, if it shows timeout, you still need to wait, if the waiting time is too long, try DNS resolution again
At this point, the domain DNS resolution is complete, the next step is to connect and deploy.
Step 3: SSH to the server and build the node
Connecting to the server
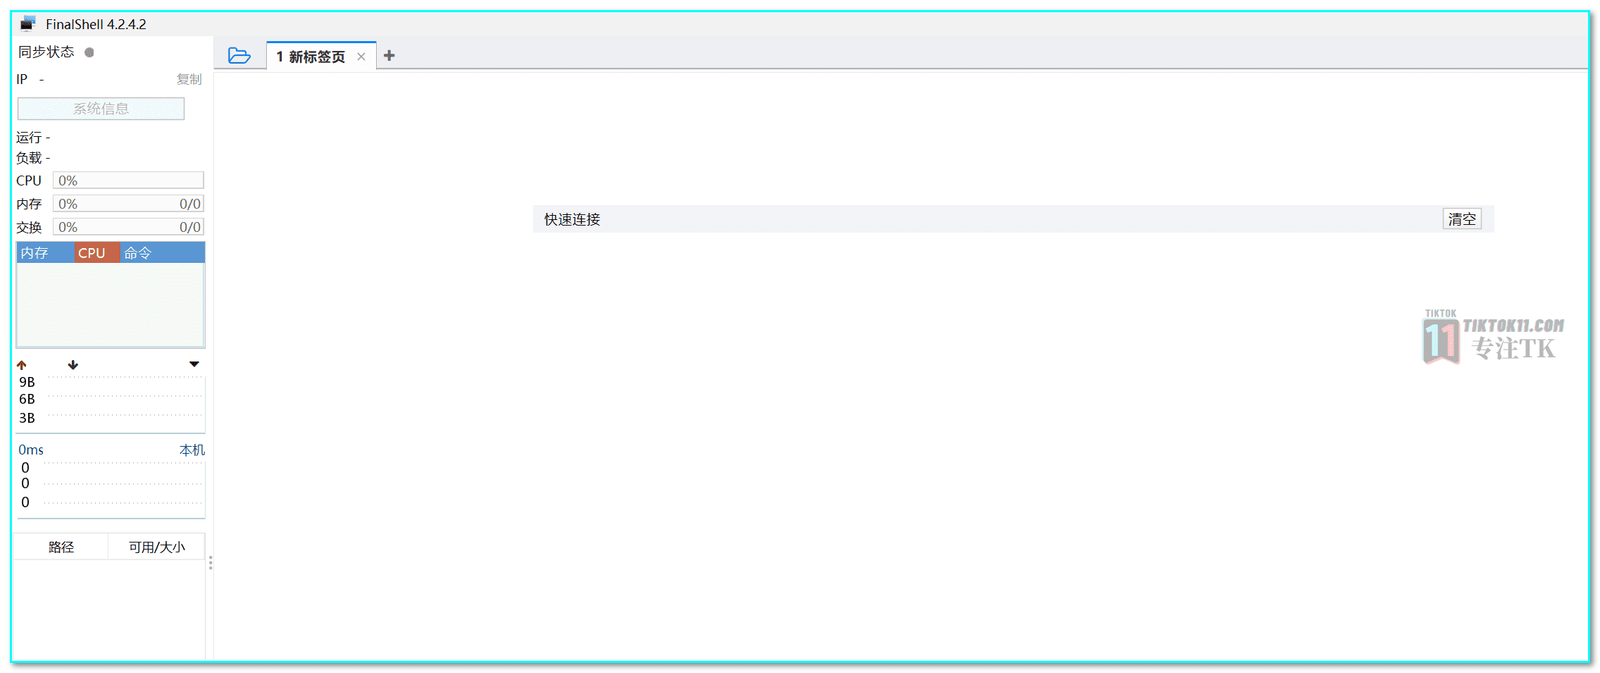
Through the first step of the steps we have successfully purchased a server, in the network we can real-time on the web page to see a variety of information about the server, but in the real world, our VPS servers are miles away across the ocean in a server room, we need to connect to our servers and deployment nodes through a tool, the most commonly used tool protocol is SSH, download ssh toolsFinalShellDownload, install, and open
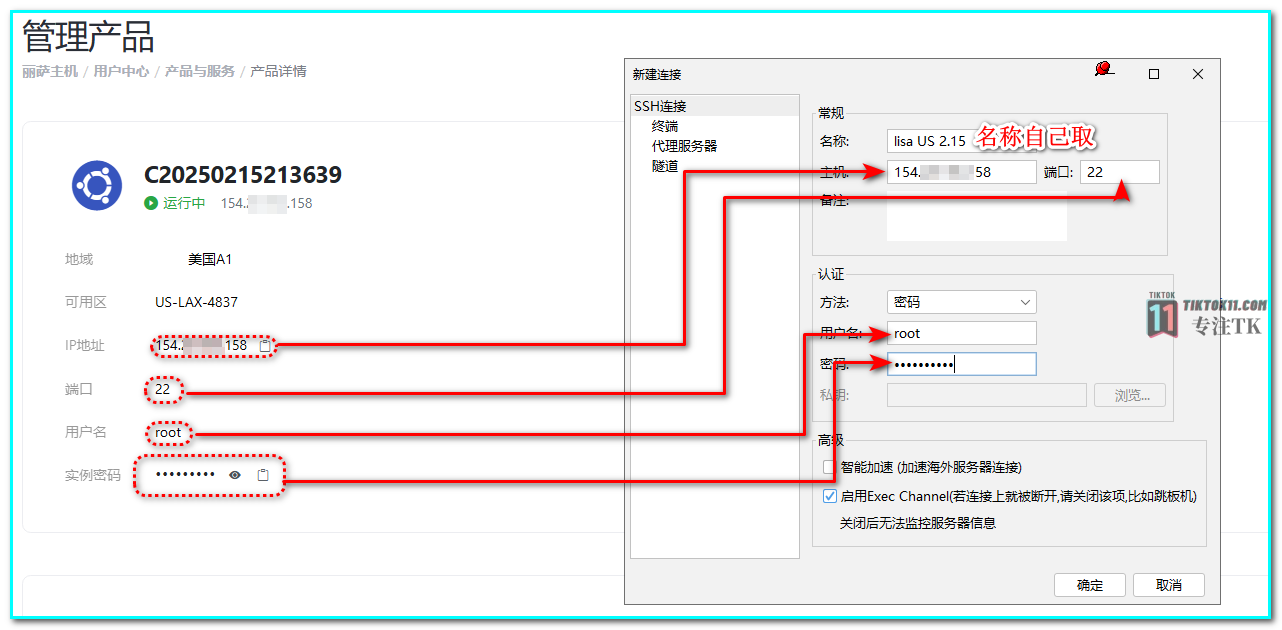
After opening FinalShell, click on "Folders" in the upper left corner of the pop-up secondary page, click on the white folder with a small plus sign in the upper left corner of the page, and select "ssh Connections" to add a new server SSH connection.
Copy and paste the password of the backend account of the purchased Lisa VPS into the input box of the new connection, and name it randomly for your own recognition.IP address for host, port 22, username for username, instance password for passwordThe following is a list of the most important things that you can do. Once the check is complete, just make sure, Smart Acceleration can try to turn on the
After clicking "OK"FinalShellwill not connect automatically, you need to go back toFinalShellClick once on the main page to create the connection configuration before you start SSH connection to the VPS, the first connection will pop up whether to save the key, click to remember and save it
One-Click Scripting to Build Visualization Panels
Previous node construction articles webmasters will use one-click script construction method, may be convenient and fast for novice friends to build, but there will be insufficient intuition and later management of inconvenience, so this article will first use one-click script to build a visualization panel, and then install the construction of the node on the visualization panel, intuitive and convenient enough.
So after connecting to the VPS, we can use a one-click script to build our visualization panel
The panel we need to build is the 3X-UI panel, some of you may have heard of this panel, it's newbie friendly and there are still quite a few node protocols that can be built
Once connected, we need to update the package list and install the curl Tools. :
CentOS and Fedora systems:
centos: yum update -y
yum install curl -y
Debian and ubuntu systems:
apt-get update -y
apt-get install curl -y
Copy the two lines of code above and paste them into ssh to update the components for whatever system you purchased.
The next step is to build a one-click script, which is pretty easy, just follow the tutorial.
Type in the script for enter:
bash <(curl -Ls https://raw.githubusercontent.com/mhsanaei/3x-ui/master/install.sh)
The script executes with a carriage return and waits for it to load, and then pops up with a query when it finishes loading:
Would you like to customize the Panel Port settings? (If not, a random port will be applied) [y/n].

Do you want to customize the panel port settings? (If not, a random port will be applied) [y/n]:
If you need to customize the panel ports, you can type Y to enter and enter the port you want, or if you want it to be random you can type n to enter
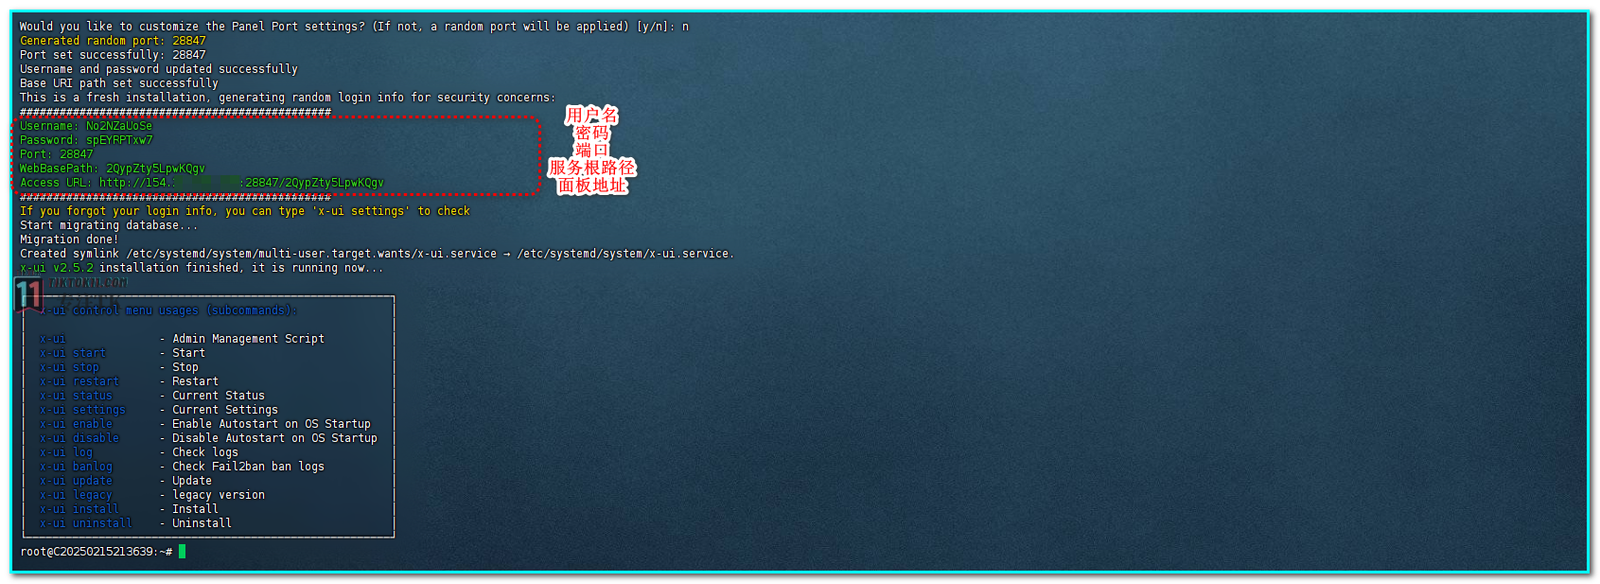
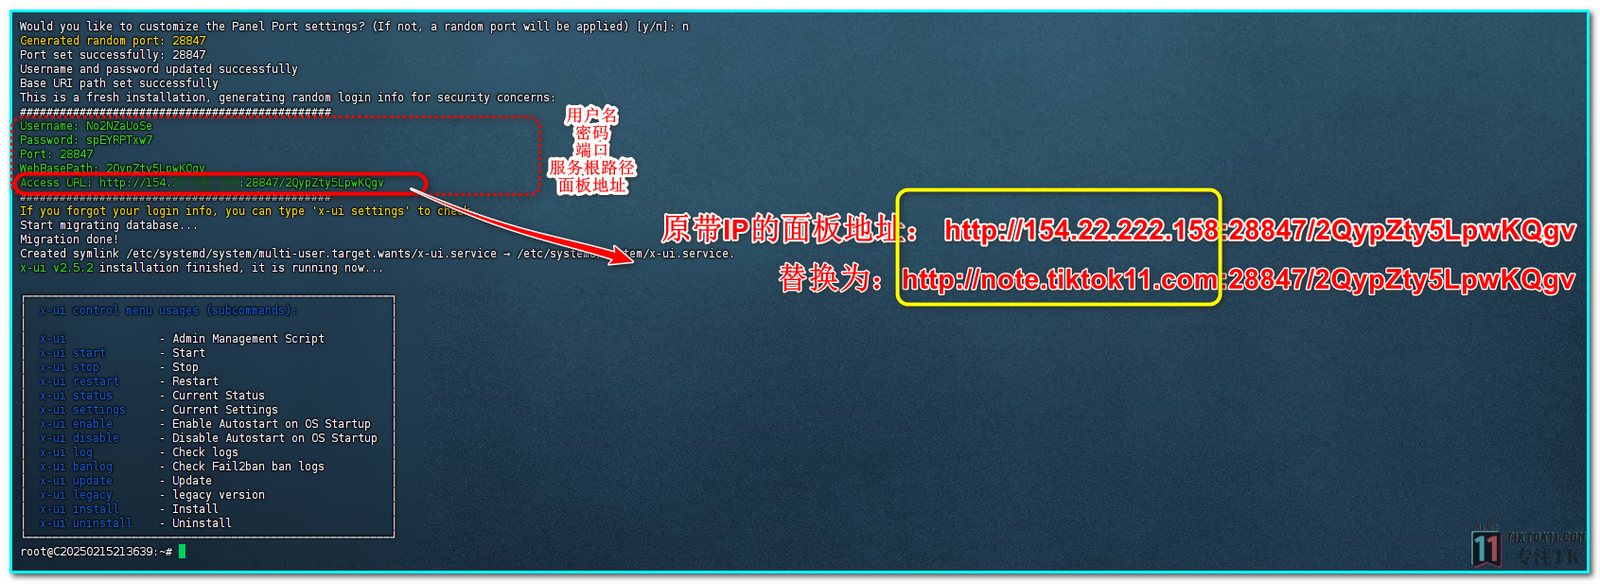
The webmaster here directly enter "n" to make it random. After typing "n" and enter, it will be executed directly and pop up the information about the panel.By this point, the panel has been constructed
You need to write down the relevant panel login address, username, password, etc. that it gives, and then you can change it in the panel, or if you don't intend to change it, you can copy and paste it into Notepad to save it so that you don't forget it!
Actually up to this point we can use the panel address it gives us to paste it into the browser search to access the panel, but right now our panel is not secure, we need to apply for a SSl certificate to encrypt and protect our panel. So next we need to apply for the certificate as well
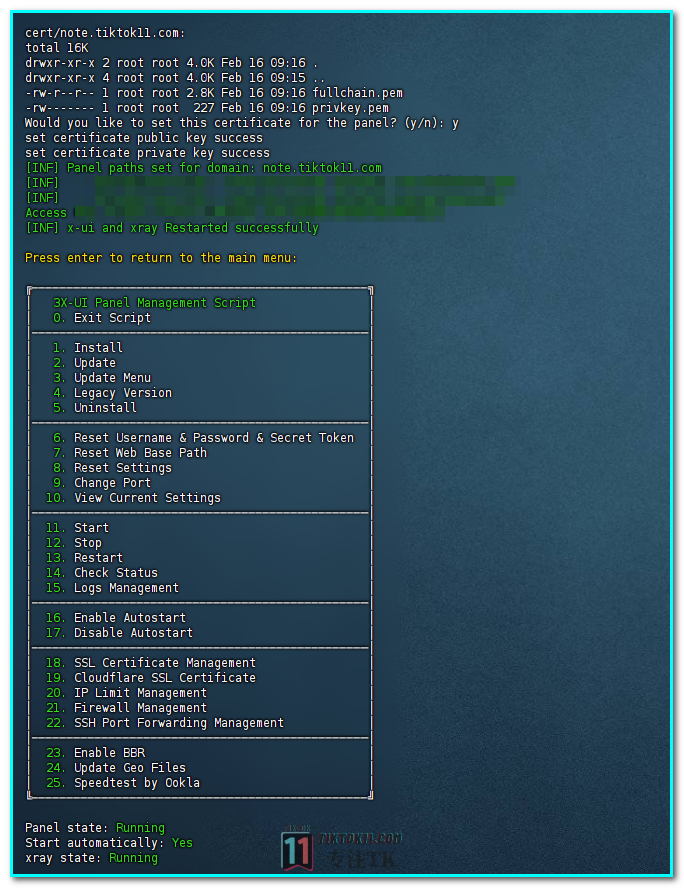
In the SSH panel typex-uiThe command panel pops up, and then you enter the number18and then enter1Obtaining Certificates

Please enter your domain name.
Please enter your domain name:
Here we buy the second step of the domain name will be useful, because only the domain name to facilitate the application of SSl certificate, according to the second step of the steps of the domain name resolution to the server, here we can fill in the resolution of domain names
Enter your previousdomain name, here the webmaster resolved the note prefix tiktok11.com domain name to the newly purchased lisa server. Just fill in note.titkok11.com:
After loading, it will ask you the port you are using, the default is port 80, if you need to change it, please enter the port number, if not, just enter "80"Just enter
In the next step, you will also be asked if you need to use a certificate for the panel, enter "y"Just enter
After that you should be done with the steps to request a certificate. Press thecarriage returnJust go back to the main menu
Now, replace the part of the panel address with the IP with the domain name you purchased the resolution of the browser can be logged in, if it is not clear, you can see the example of the following image
Step 4: Access the panel and create nodes
Login Panel
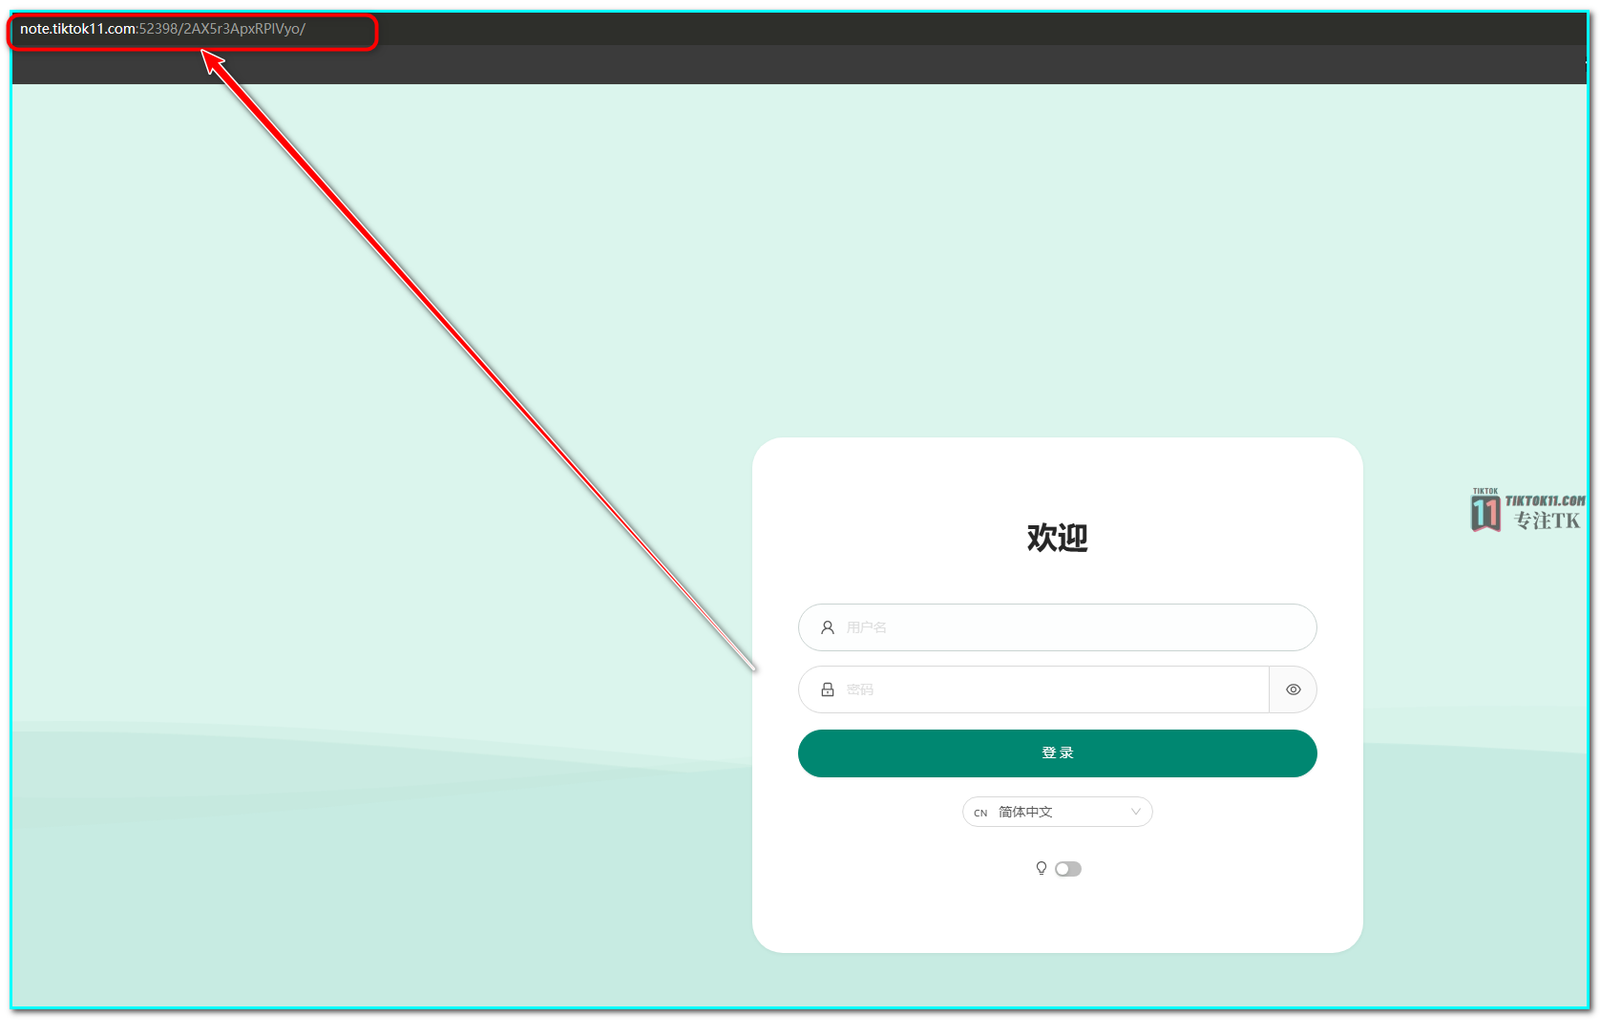
Next we can access the panel, in the browser search box, enter the panel address after the replacement of the above enter, the following panel will appear in the login screen, if you can not access, please check the settings of the panel port whether the release, no release can try to use in the SSH interfaceufw allowCode to release ports, example: if you need to release port 80, code: ufw allow 80
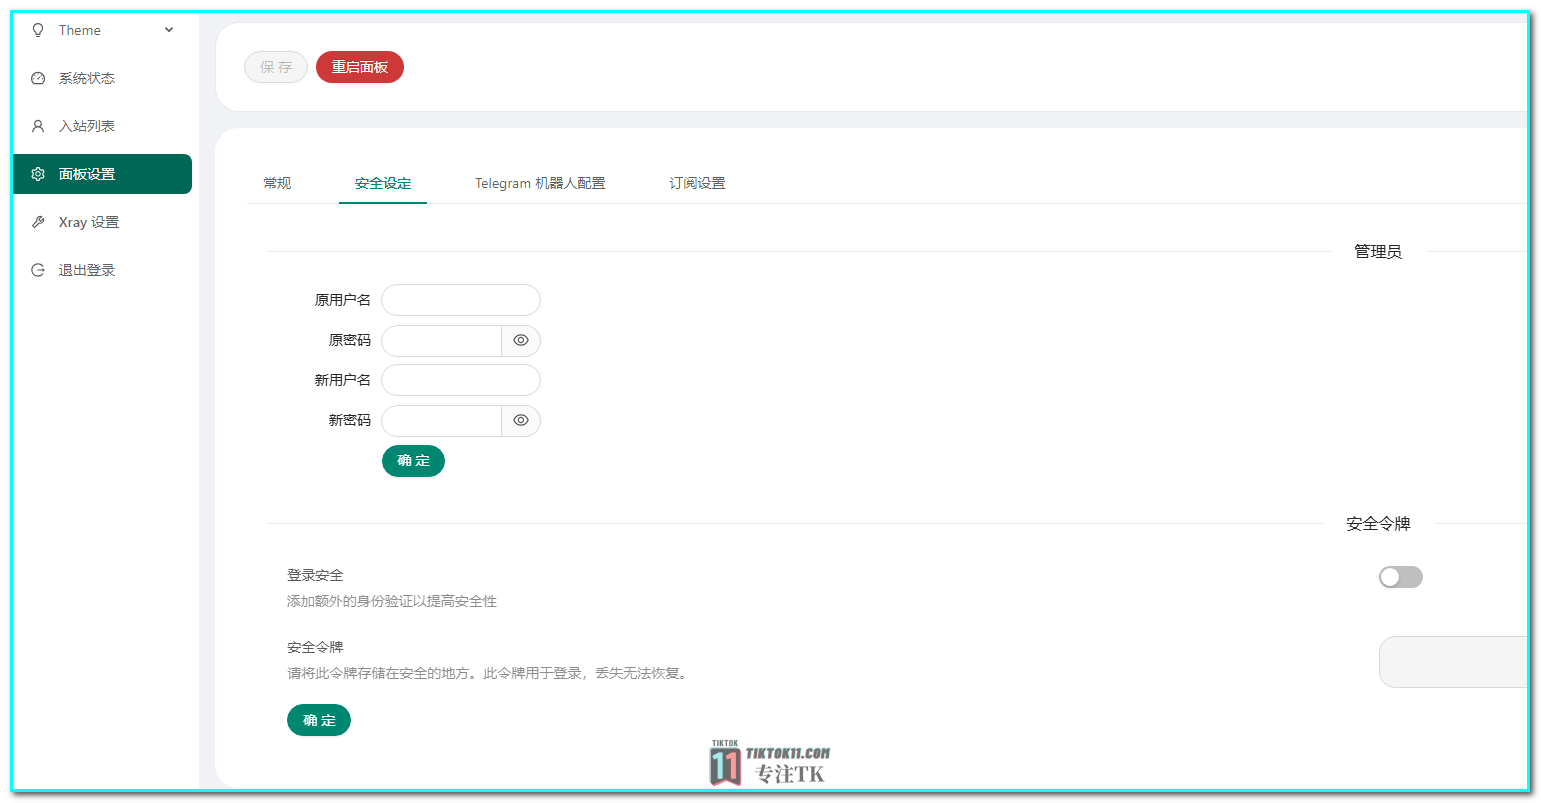
If you can't log in, the first time you log in you can log in by entering the account number and password it gives you on the SSH page, and after that you can log in on thePanel settings--Security settingsYou can change your account number and password in the "Change Account Number and Password" section, and then you need to enter the changed password when you log in the panel again.
Construction nodes
Next we selectinbound list--Add Inbound
Note a name for identification
Protocol Selectionvless
portsYou can choose your own, but make sure that this port is open and accessible
transmission optiontcp
safe choicereality
Target要填写icloud.com:443
SNI要填写icloud.com,www.icloud.com
ClickGet New CertApplication for certificates
Other places you can change if you understand, if you do not understand to keep the original can be, and then click Add can be, which adds a node, the following is a dynamic diagram for reference
At this point our node has been built, you can import it into the software device to connect, but in order to ensure that we use the experience, but also need to install bbr accelerate!
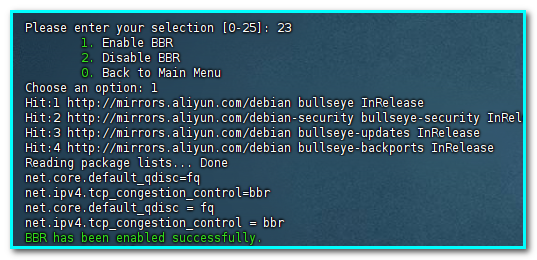
Go back to the ssh panel and typex-uiBring up the panel menu and enter23Enter to execute, and then type1Enter to execute, so our BBR acceleration is installed!
At this point, all the construction work of our tiktok node is complete, and then we also need to import it into the client agent software to use
Step 5: Import the node into the client software connection
Below is a tutorial for each client to connect to the node:
Windows Connection Node
Go to github to downloadv2rayNWindows Downloadv2rayN-windows-64.zipIf you want to use v2rayN, unzip it and click v2rayN.exe to open it, click on the plus sign on the left side of the node, click on the small exclamation mark that slides out, copy the URL, return to the v2rayn panel and paste the link to import the node, and then right click on the mouse to set it as the active node.
After that, click on the system tray in the lower right corner of the computer, right-click on the v2rayN icon, select the system proxy, select the automatic configuration of the system proxy, the route can choose to bypass the continent or global, you can also open the tun mode to open the real global. v2rayN icon turns red after you can log in to youtube.com such as the site is connected or not!
Webmaster windows connected to run a speed test, it can be, almost run out of the 300mbps bandwidth given, some loss is unavoidable, the node is still quite fast, just for reference!
Android node connection
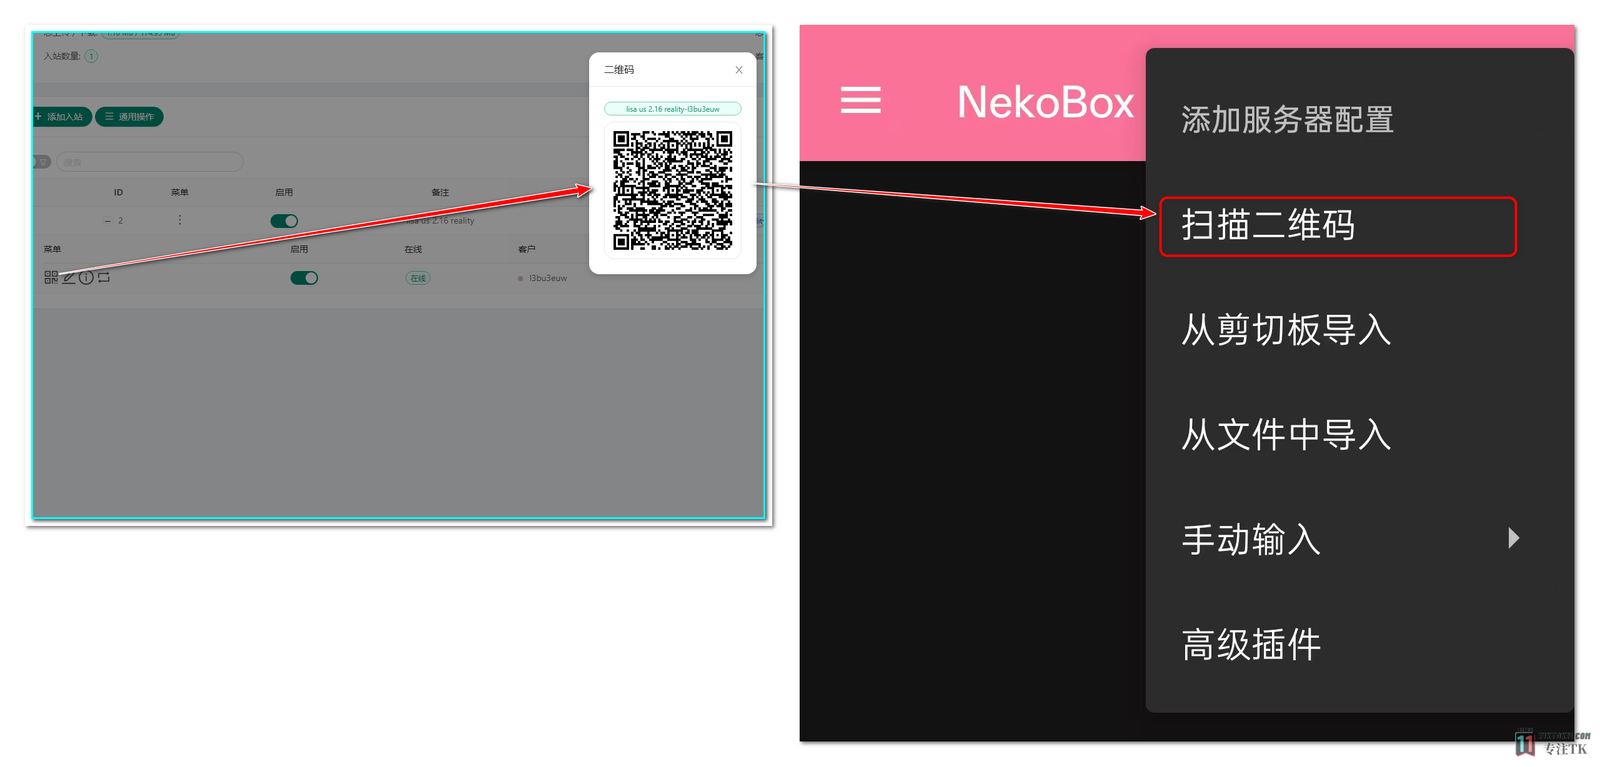
The Android connection is even easier, also click on the plus sign on the left side of the panel node, then click on the QR code option that slides out, a QR code will appear, and Android mobile to download and install it NekoBox for Androidorv2rayNGFor example, take Nekobox as an example, after installation, click Add Server Configuration in the upper right corner - Scan QR Code. Then the QR code node in the scanning panel can be imported, after that, select the node and click on the paper airplane to connect
ios side node connection
Apple system webmaster only recommend small rocket (Shadowrocket), its use experience, the number of users, support protocols, etc. are extremely excellent, but its download conditions are a bit troublesome, first of all, you have to have a U.S. Apple ID, only the U.S. app store you can search Shadowrocket, and the download requires 3 dollars.
If you've already purchased Shadowrocket in the Apple Mobile App Store, you'll need to update the software toLatest version 2.2.43.Only the latest version supports the hysteria2 protocol.
If you don't have a U.S. Apple ID or a payment channel.Then I recommend that you directly buy someone else has purchased the small rocket of the U.S. Apple ID login Apple Store direct download.Here is a recommended store to buy from:
Click here to buy Little Rocket
Here's a reminder to watch how to use the purchased Apple ID before buying it to log into the store only.Don't log in to the setup.
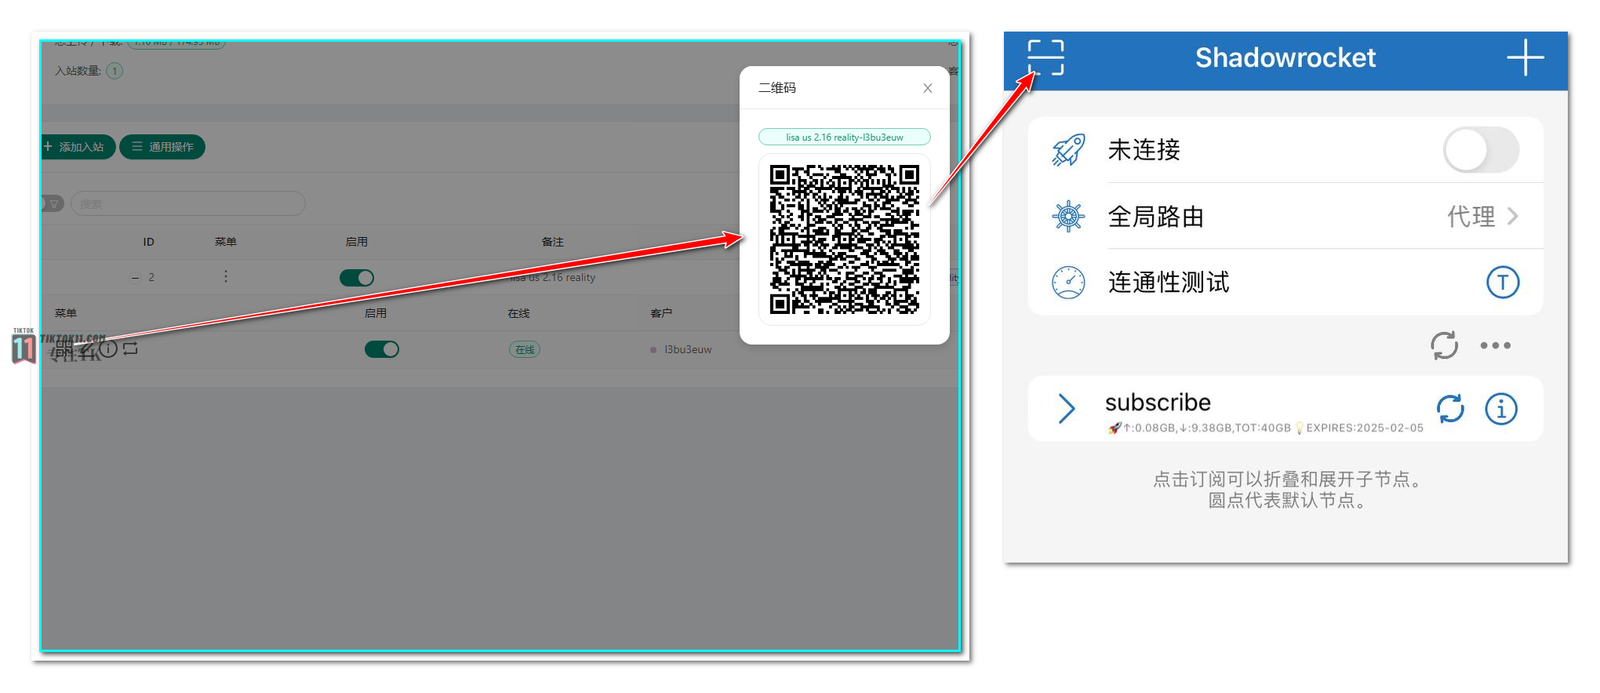
Little Rocket can also be imported directly by scanning the code, after installing it in the Apple Store, open it and click the Scan button on the top left. Scan the QR code of the node in the panel to import it directly
After importing, click on the imported node, and then turn on the top of the unconnected switch, it is connected, and then you can try to visit google, youtube and other sites to try to access whether it is smooth!
Above, about tiktok node construction, connection and other processes are all completed, the following is some extended optimization content
Extended Tutorial: Node Forwarding
If you just for daily operation, then this configuration of the node is already enough, lisa host line optimization is already enough to ensure the stability and smoothness of daily operation, but if you have more stringent requirements for speed latency and stability, then you can use transit to optimize, so the next is about the node transit tutorials, what is the use of transit? Simply put, it is able to make the node more high-speed and stable, latency reduction, after the transit node can be reduced from 200ms network latency to 30-60ms, significantly improve the experience, of course, it is also necessary to increase the cost of some of the need to purchase forwarding packages!
Here is a detailed tutorial:
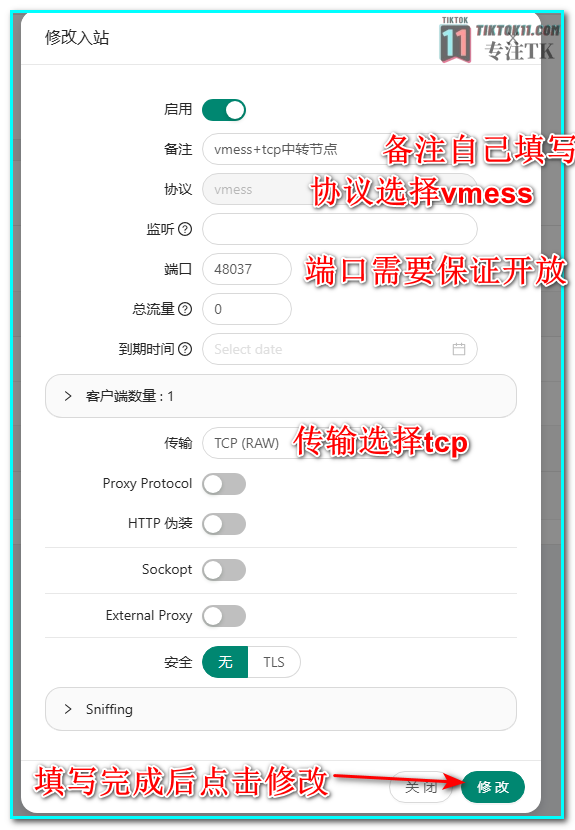
Since the x-ui panel has some problems with the vless protocol transit, we need to build a new node, come to the panel and click on theinbound list--Add Inbound, use vmess+tcp or ss protocol, the webmaster here is used to use vmess+tcp, the following is the relevant picture for reference:
Then we build the node how to transit it, there are many on the market to provide such transit service providers, but the service providers also have good and bad, good line stable high-speed nature of expensive, bad line although cheap but sometimes slow down the speed of the opposite is not as good as transit, so a good cost-effective transit service provider is still relatively difficult to find.
Webmaster here to recommend a webmaster to use down a more reliable and stable a transit service provider ---GoRelay Transit Service ProviderIf you have a good service provider, you can also choose your own 👇.
Click to go directly to GoRelay transit service providers
Register for an account first, and after registering for an account go toGoRelayBackstage home page, if you want to use need to buy a package, want to buy a package friends can be recharged!
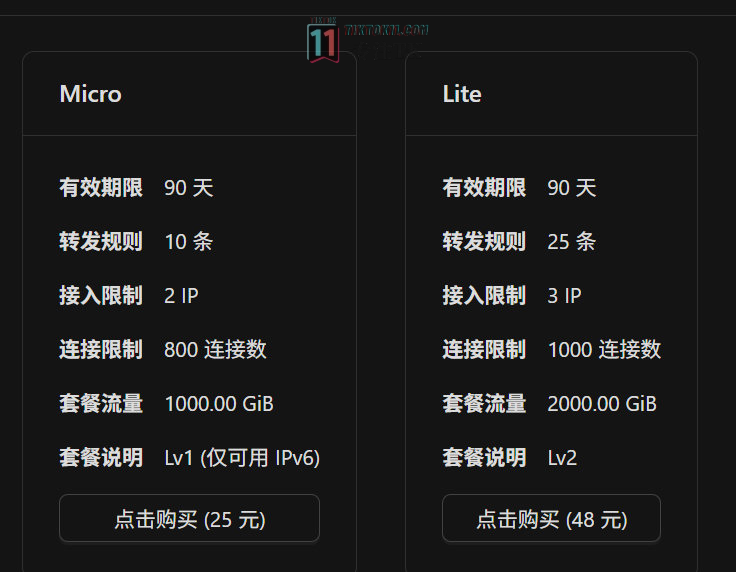
Because it is a tutorial example, the webmaster here to buy a Micro package, high budget friends can go on a more advanced package with better line package, according to their own needs to choose, all packages are quarterly prices, that is, after the purchase can be used for three months, the business said that the current belongs to the loss of money to make money, the follow-up may increase the price, support for the RMB and cryptocurrency usdt
注意!!目前GoRelaymicro套餐也就是LV1节点只支持转发ipv6了,很多网络环境不支持,所以有需求的朋友尽量选择Lite套餐,因为GoRelay不支持退款服务,如果有疑虑最好选择Lite套餐或者换一家中转服务商
After purchasing the package, we can carry out the transit configuration, click on the forwarding rules, and then click to add the rules, the name is arbitrary, the entrance here need to focus on a few lines seen is the entrance to the line, select an entrance, these are the entrance to the line, Guangzhou Hong Kong IEPL is the IEPL line from Guangzhou to Hong Kong, Shanghai Hong Kong is the Shanghai to Hong Kong, Shanghai is the Shanghai-Japan is the Shanghai-Japan, the freedom to choose, the flow has been sent out to the request has been sent back. Traffic has sent out a request to send back the return, single-ended means that only the entrance to this end, the exit needs to choose their own or docking, can be used to save the node being walled, generally choose the double-ended.
Times 10 is that you normally surf the Internet 1M of traffic through the forwarding of the forwarding of the consumption of leased-line traffic will be calculated in 10M, so 25 yuan package 1 has 1000G has been 10 times the rate of the leased-line, then the normal emotional consumption of 100GVPS traffic leased-line traffic 1000G will run out of traffic can not be forwarded to take the leased-line, you need to continue to buy the leased-line traffic to forwarding!
The webmaster here chooses the Guanggang IEPL for forwarding.
Listening entry to leave empty, the target address needs to fill in the IP and port of our node, back to v2rayN, double-click on the constructed node, you can see the information of the node, will be the node address IP (or domain name) and the port in order to IP:PortFill in the form ofGoRelaytarget address
The following is a comparison of the webmaster's speed measurements before and after the transit, and the improvement is still obvious:

Concluding remarks
This article ends here, this article webmaster is to spend a little time to write, has nearly 10,000 words, with illustrations and even dynamic diagrams, is exhaustive to the extreme node construction articles, of course, do not dare to say perfect. If there are any deficiencies welcome to comment in the comments section, tiktok node is just a tool, is a novice friend into titkok the first step threshold. It is necessary, but to be honest there is no need to be too time-consuming and superstitious, the ultimate goal of entering tiktok is to dig gold in tiktok, and do not feel that an IP node will allow your uploaded video playback to explode, I once said to a lot of newbie friends who came to the consultation, a good tiktok IP node is a necessary condition of the operation of the tiktok account is not a sufficient condition. What's more important is the quality of the video, the amount of updates, operational practices, etc. to this point.
Well, thank you for being able to read here, this is tiktok11.com, has been focusing on TK. here will be updated from time to time some dry tips articles, if it is useful to you, remember to bookmark this site.
Tutorial Q&A


